Mastering UV Mapping in Blender 8: A Comprehensive Guide to Scaling and Optimization
Related Articles: Mastering UV Mapping in Blender 8: A Comprehensive Guide to Scaling and Optimization
Introduction
With great pleasure, we will explore the intriguing topic related to Mastering UV Mapping in Blender 8: A Comprehensive Guide to Scaling and Optimization. Let’s weave interesting information and offer fresh perspectives to the readers.
Table of Content
- 1 Related Articles: Mastering UV Mapping in Blender 8: A Comprehensive Guide to Scaling and Optimization
- 2 Introduction
- 3 Mastering UV Mapping in Blender 8: A Comprehensive Guide to Scaling and Optimization
- 3.1 Understanding UV Map Scaling
- 3.2 Methods for Scaling UV Islands in Blender 8
- 3.3 Optimizing UV Map Scaling for Efficient Texturing
- 3.4 FAQs Regarding UV Map Scaling in Blender 8
- 3.5 Tips for Efficient UV Map Scaling in Blender 8
- 3.6 Conclusion
- 4 Closure
Mastering UV Mapping in Blender 8: A Comprehensive Guide to Scaling and Optimization

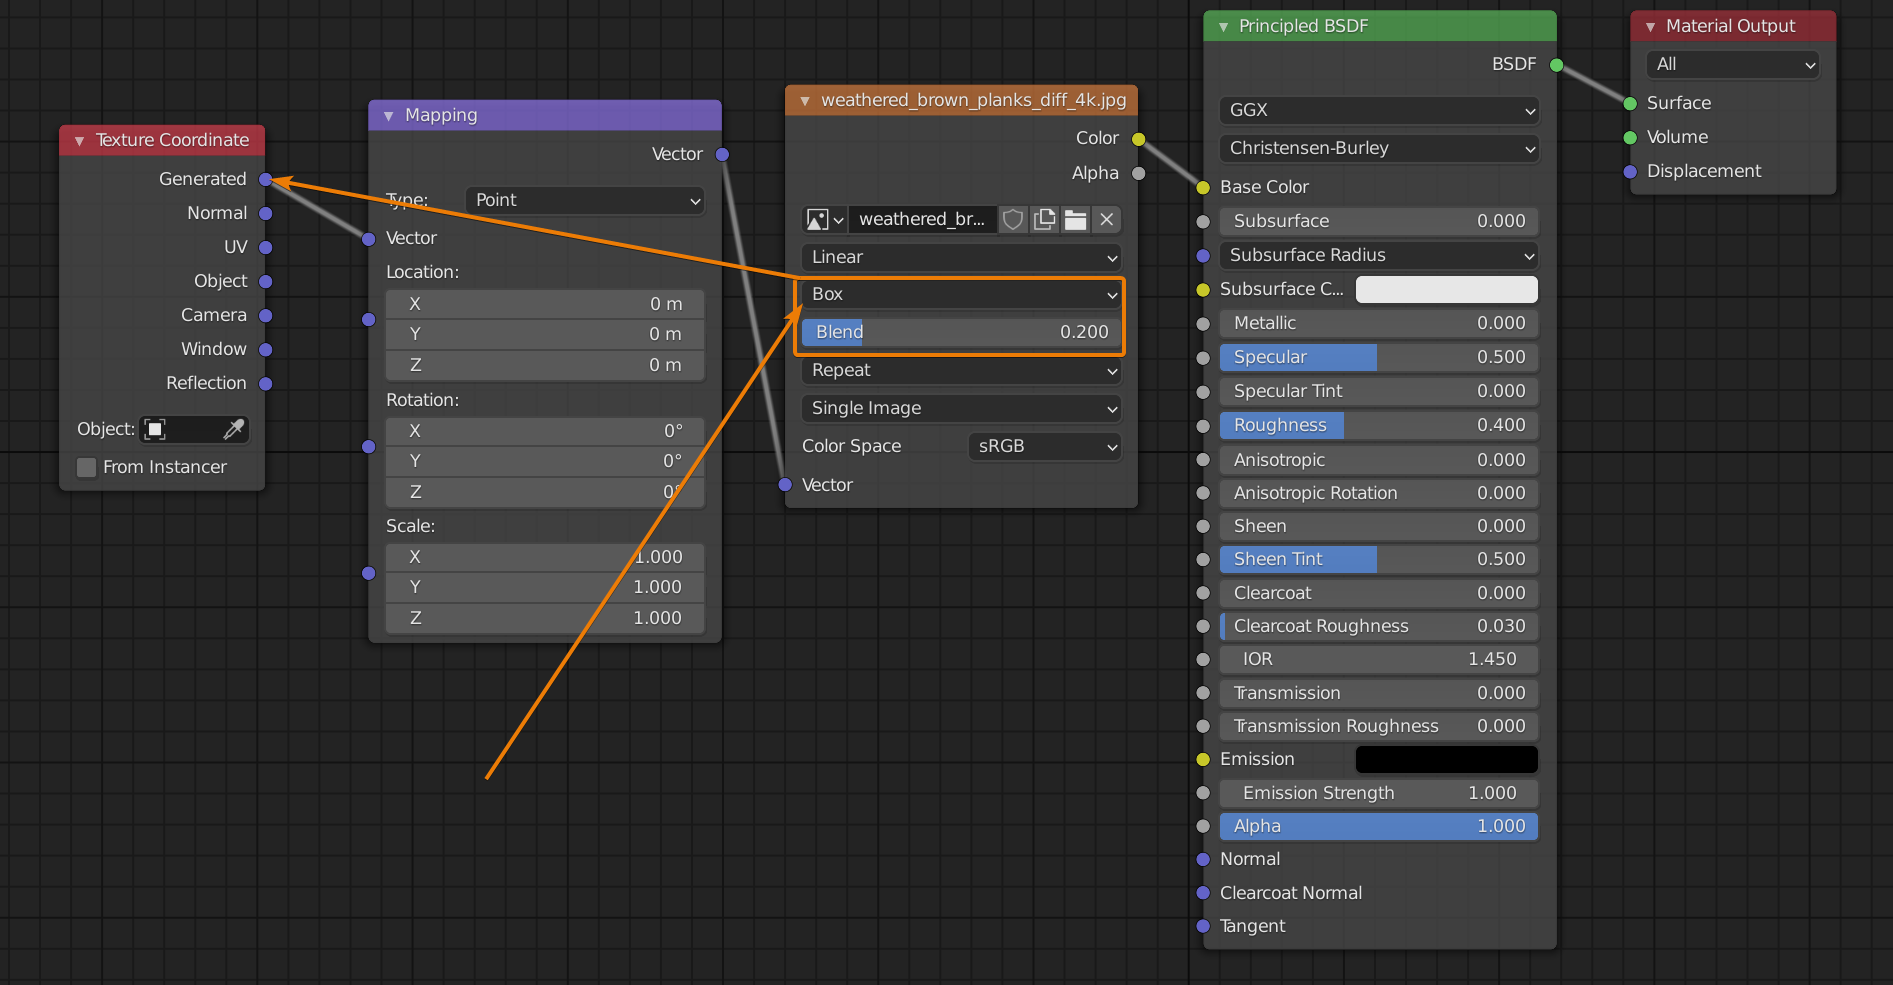
UV mapping is a fundamental technique in 3D modeling that allows artists to control how textures are applied to objects. In Blender 8, the UV map represents a 2D representation of the object’s surface, enabling artists to manipulate the texture’s placement, scaling, and distortion. This process ensures textures are applied accurately and realistically, enhancing the visual fidelity of the final render.
Understanding UV Map Scaling
UV map scaling refers to adjusting the size of the UV islands within the UV editor. These islands represent individual sections of the 3D model’s surface, and their size directly impacts how the texture is applied. Scaling the UV islands appropriately is crucial for achieving a seamless and visually appealing texture mapping.
Benefits of Proper UV Map Scaling:
- Texture Resolution Optimization: Scaling UV islands to an appropriate size allows artists to utilize texture resources efficiently. By avoiding unnecessarily large UV islands, artists can reduce the overall file size and improve rendering performance.
- Preventing Texture Distortion: Incorrectly sized UV islands can lead to unwanted texture stretching or compression, distorting the appearance of the object. Proper scaling ensures the texture is applied evenly, preserving its original proportions and detail.
- Accurate Texture Placement: Scaling UV islands allows artists to precisely control the placement of textures on the object. This is particularly important for complex models with intricate details or multiple materials.
- Seamless Texture Blending: When multiple UV islands share a common edge, proper scaling ensures the textures blend seamlessly, avoiding visible seams or artifacts.
Methods for Scaling UV Islands in Blender 8
Blender 8 offers several methods for manipulating UV map scaling, providing flexibility and control over the process.
1. Manual Scaling:
- Select the UV island: In the UV editor, select the desired UV island using the selection tools.
- Scale the island: Utilize the "S" key to activate the scaling tool. Use the mouse to adjust the size of the selected UV island. Hold "Shift" to constrain scaling along a specific axis.
- Fine-tune adjustments: Blender’s precise scaling tools allow for minute adjustments to achieve the desired size and proportion.
2. Using the "Scale" Tool:
- Access the "Scale" tool: Navigate to the "UV" menu in the 3D Viewport and select "Scale."
- Define scaling parameters: Specify the scaling factor and select the desired axis for scaling.
- Apply the scaling: Click "Apply" to execute the scaling operation.
3. Auto-Scaling with "Pack Islands":
- Select UV islands: Choose the UV islands you wish to pack.
- Activate "Pack Islands": Navigate to the "UV" menu in the 3D Viewport and select "Pack Islands."
- Adjust packing parameters: Configure the packing method (e.g., "Margin" or "Grid") and specify the desired spacing between islands.
- Execute packing: Click "Pack" to automatically scale and arrange the selected UV islands.
4. Using the "UV Project" Modifier:
- Add the modifier: In the object’s Properties panel, select the "Modifiers" tab and add a "UV Project" modifier.
- Define projection parameters: Configure the projection method (e.g., "Plane" or "Cylinder") and adjust the projection settings.
- Apply the modifier: Click "Apply" to permanently integrate the UV projection onto the object’s mesh.
Optimizing UV Map Scaling for Efficient Texturing
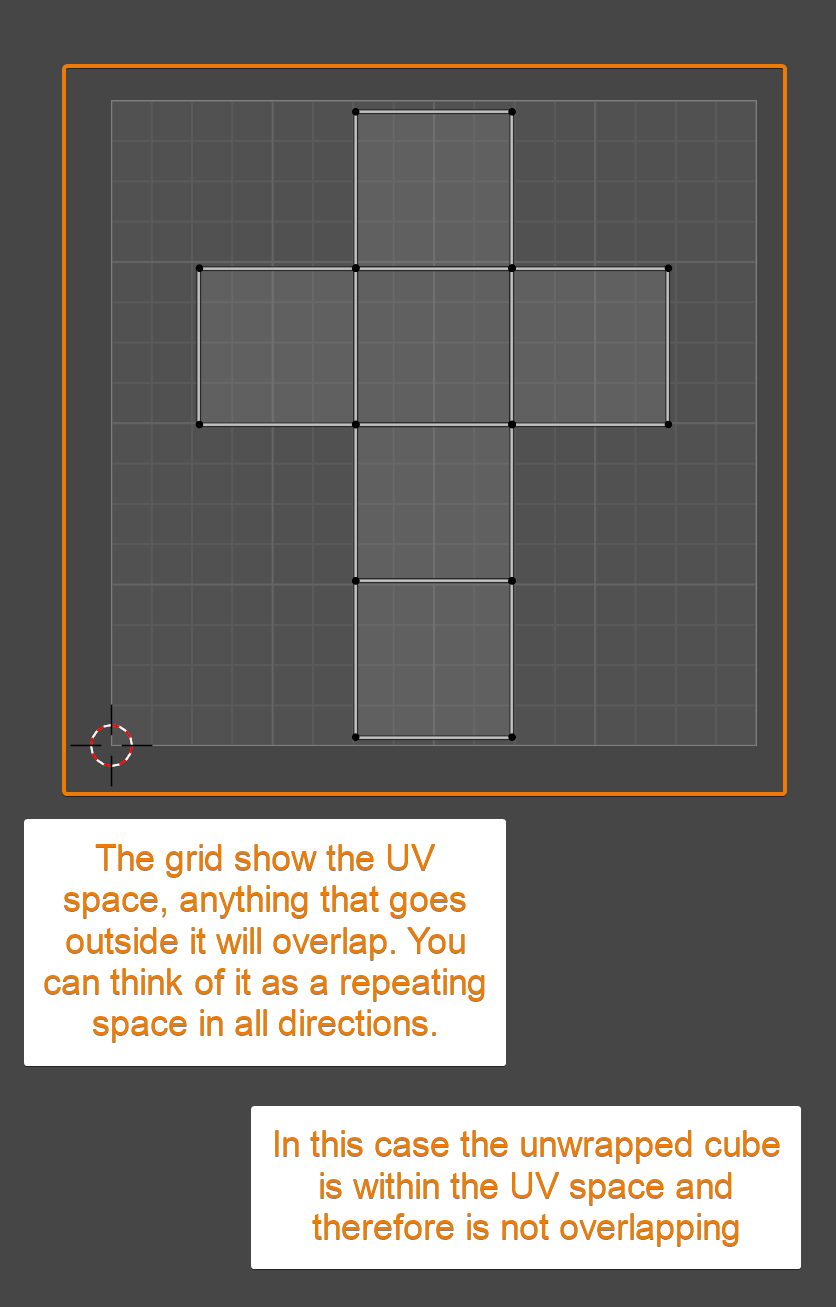
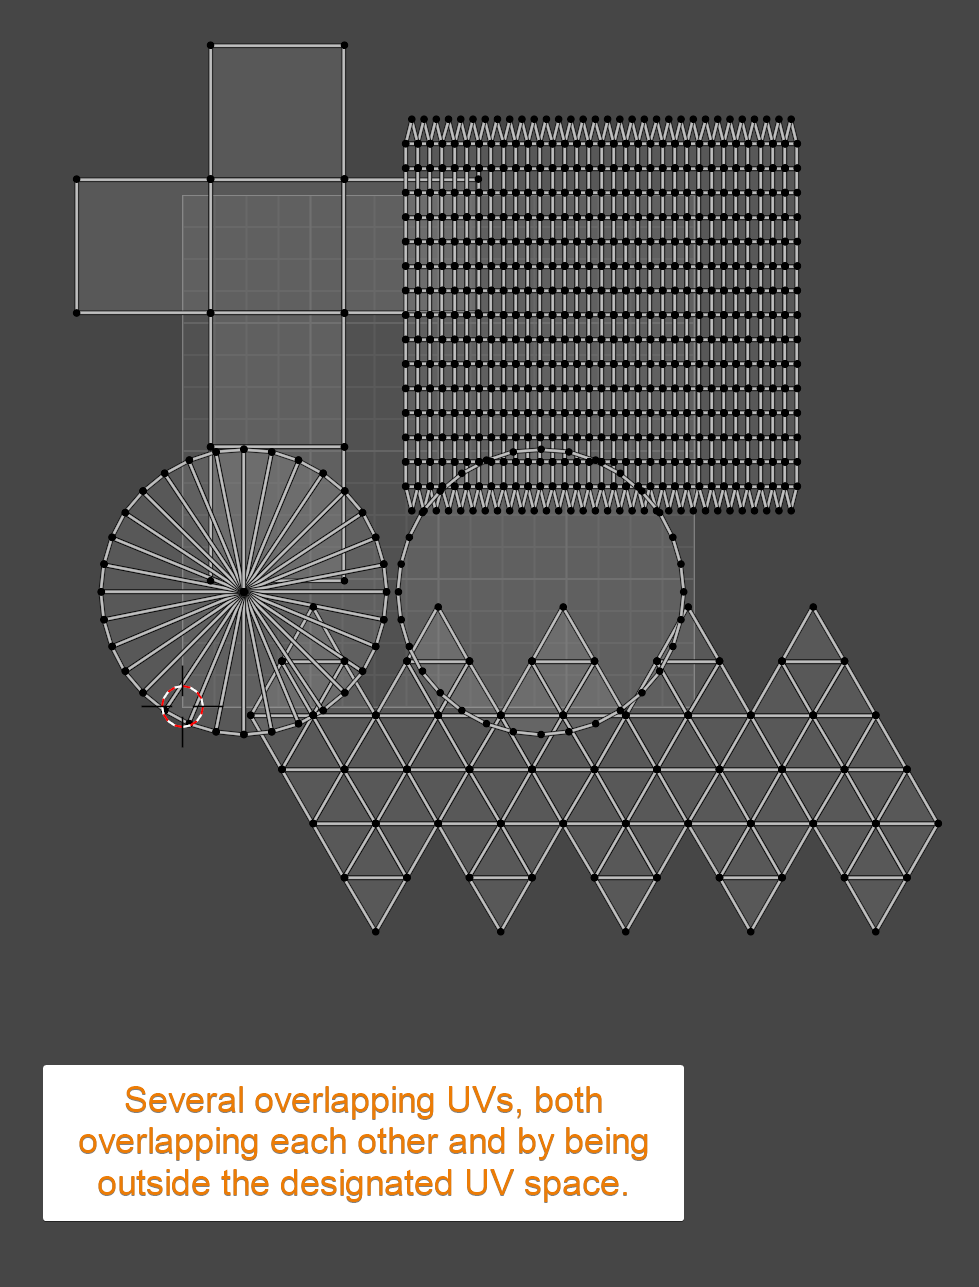
- Minimize UV Island Overlap: Avoid overlapping UV islands, as this can lead to texture blending issues and increase file size.
- Maintain Consistent UV Island Sizes: Strive for consistent UV island sizes within the same material. This ensures uniform texture application and prevents visual inconsistencies.
- Optimize UV Island Density: Adjust the density of UV islands based on the complexity of the model and the level of detail required for the texture. Higher density UV islands offer greater precision but can increase file size.
- Utilize UV Seams Strategically: Employ UV seams to separate UV islands effectively, ensuring smooth texture transitions and preventing unwanted distortion.
- Consider UV Island Shape: Optimize UV island shapes for efficient texture mapping. Rectangular or square islands are generally preferred for minimizing distortion.
FAQs Regarding UV Map Scaling in Blender 8
Q: What are the ideal UV island dimensions?
A: There is no definitive answer to this question, as the ideal UV island size depends on the specific model, texture resolution, and desired level of detail. However, a general guideline is to aim for UV islands that are neither too large nor too small, ensuring a balance between texture resolution and file size.
Q: How can I identify potential scaling issues in my UV map?
A: Visual inspection of the UV editor can help identify potential issues. Look for stretched or compressed UV islands, overlapping islands, or areas where the UV layout appears uneven.
Q: What are the consequences of using a poorly scaled UV map?
A: A poorly scaled UV map can result in texture distortion, uneven texture application, and increased file size. It can also lead to visual artifacts and rendering issues.
Q: Can I scale UV islands after applying a texture?
A: Yes, you can scale UV islands after applying a texture. However, scaling the UV islands after applying the texture may require adjusting the texture itself to maintain the desired appearance.
Q: How can I improve my UV map scaling workflow?
A: Develop a consistent workflow for UV mapping, including practices like using UV seams strategically, optimizing UV island shapes, and regularly inspecting the UV layout for potential scaling issues.
Tips for Efficient UV Map Scaling in Blender 8
- Utilize UV Seams: Employ UV seams to separate UV islands effectively, ensuring smooth texture transitions and preventing unwanted distortion.
- Use the "Pack Islands" Tool: Leverage the "Pack Islands" tool to automatically arrange and scale UV islands, minimizing manual adjustments.
- Experiment with Different Scaling Methods: Try different scaling methods to find the approach that best suits your workflow and specific needs.
- Regularly Inspect the UV Layout: Make it a habit to regularly inspect the UV layout for potential scaling issues, ensuring that the texture is applied accurately and consistently.
Conclusion
Mastering UV map scaling is a critical aspect of creating realistic and visually appealing 3D models. By understanding the principles of UV mapping and utilizing the tools available in Blender 8, artists can optimize their workflow, achieve efficient texture mapping, and enhance the overall quality of their 3D models. Through careful planning, consistent practices, and a keen eye for detail, artists can ensure their UV maps are scaled appropriately, resulting in high-quality renders that showcase their artistic vision.


Closure
Thus, we hope this article has provided valuable insights into Mastering UV Mapping in Blender 8: A Comprehensive Guide to Scaling and Optimization. We hope you find this article informative and beneficial. See you in our next article!