
The Map Function in Arduino: A Comprehensive Guide
Related Articles: The Map Function in Arduino: A Comprehensive Guide
Introduction
In this auspicious occasion, we are delighted to delve into the intriguing topic related to The Map Function in Arduino: A Comprehensive Guide. Let’s weave interesting information and offer fresh perspectives to the readers.
Table of Content
- 1 Related Articles: The Map Function in Arduino: A Comprehensive Guide
- 2 Introduction
- 3 The Map Function in Arduino: A Comprehensive Guide
- 3.1 Understanding the map() Function
- 3.2 How map() Works: A Visual Explanation
- 3.3 Applications of the map() Function in Arduino Projects
- 3.4 Practical Examples of map() in Action
- 3.5 Importance and Benefits of the map() Function
- 3.6 FAQs about the map() Function
- 3.7 Tips for Using the map() Function Effectively
- 3.8 Conclusion
- 4 Closure
The Map Function in Arduino: A Comprehensive Guide
The Arduino platform, renowned for its accessibility and versatility, relies heavily on functions to simplify complex tasks. Among these functions, the map() function stands out as a powerful tool for scaling and transforming values, making it indispensable for various applications. This article aims to provide a comprehensive understanding of the map() function, its functionalities, and its applications in Arduino programming.
Understanding the map() Function
At its core, the map() function provides a mechanism to translate a value from one range to another. Imagine you have a sensor reading that ranges from 0 to 1023, but you need to display this value on a screen that accepts a range of 0 to 255. The map() function allows you to seamlessly convert the sensor reading to the appropriate range for the screen.
The function’s syntax is straightforward:
long map(long x, long in_min, long in_max, long out_min, long out_max)This function takes five arguments:
- x: The value you wish to map.
- in_min: The minimum value of the input range.
- in_max: The maximum value of the input range.
- out_min: The minimum value of the output range.
- out_max: The maximum value of the output range.
The map() function then calculates a corresponding value within the output range based on the input value and the defined ranges.
How map() Works: A Visual Explanation
To grasp the concept of mapping, consider a simple analogy. Imagine a ruler with markings from 0 to 10. Now, you want to translate these markings to a different ruler with markings from 0 to 20. The map() function acts like a translator, converting the values on the first ruler to the corresponding values on the second ruler.
If you have a value of 5 on the first ruler, the map() function will determine the equivalent value on the second ruler. Since the second ruler has twice the range of the first, the corresponding value would be 10. This is how the function scales the input value to fit within the desired output range.
Applications of the map() Function in Arduino Projects
The map() function finds widespread use in various Arduino projects, including:
-
Sensor Data Processing: Sensors often provide readings in a specific range, which may not be suitable for direct use by actuators or display devices. The
map()function allows you to convert these readings to a more appropriate range. For example, a potentiometer might output values from 0 to 1023, while a motor controller might require values from 0 to 255. Themap()function can seamlessly bridge this gap. -
Control Signal Generation: The
map()function is crucial for generating control signals for actuators, such as motors, solenoids, and servo motors. By mapping the input values (e.g., from a joystick or a slider) to the appropriate range for the actuator, you can control its behavior precisely. -
Data Visualization: When displaying sensor data on an LCD screen or a graph, the
map()function can be used to scale the data to fit the display’s resolution. This ensures that the data is displayed accurately and clearly, enhancing the visual representation of the information. -
User Interface Design: In projects involving user interaction, the
map()function can be used to map input values from buttons, touchscreens, or other interfaces to control parameters within your program. This allows for a more intuitive and responsive user experience.
Practical Examples of map() in Action
To illustrate the practical applications of the map() function, let’s explore a few examples:
1. Mapping Potentiometer Readings to Motor Speed:
int potPin = A0; // Potentiometer connected to analog pin A0
int motorPin = 3; // Motor connected to digital pin 3

void setup()
  pinMode(motorPin, OUTPUT);


void loop()
  int potValue = analogRead(potPin); // Read potentiometer value
  int motorSpeed = map(potValue, 0, 1023, 0, 255); // Map to motor speed range
  analogWrite(motorPin, motorSpeed); // Control motor speed
In this code, the potentiometer reading is mapped to the range of 0 to 255, which is the appropriate range for controlling the motor speed using the analogWrite() function.
2. Mapping Sensor Readings to LCD Display:
int sensorPin = A1; // Sensor connected to analog pin A1
LiquidCrystal lcd(12, 11, 5, 4, 3, 2); // LCD connections
void setup()
lcd.begin(16, 2); // Initialize LCD
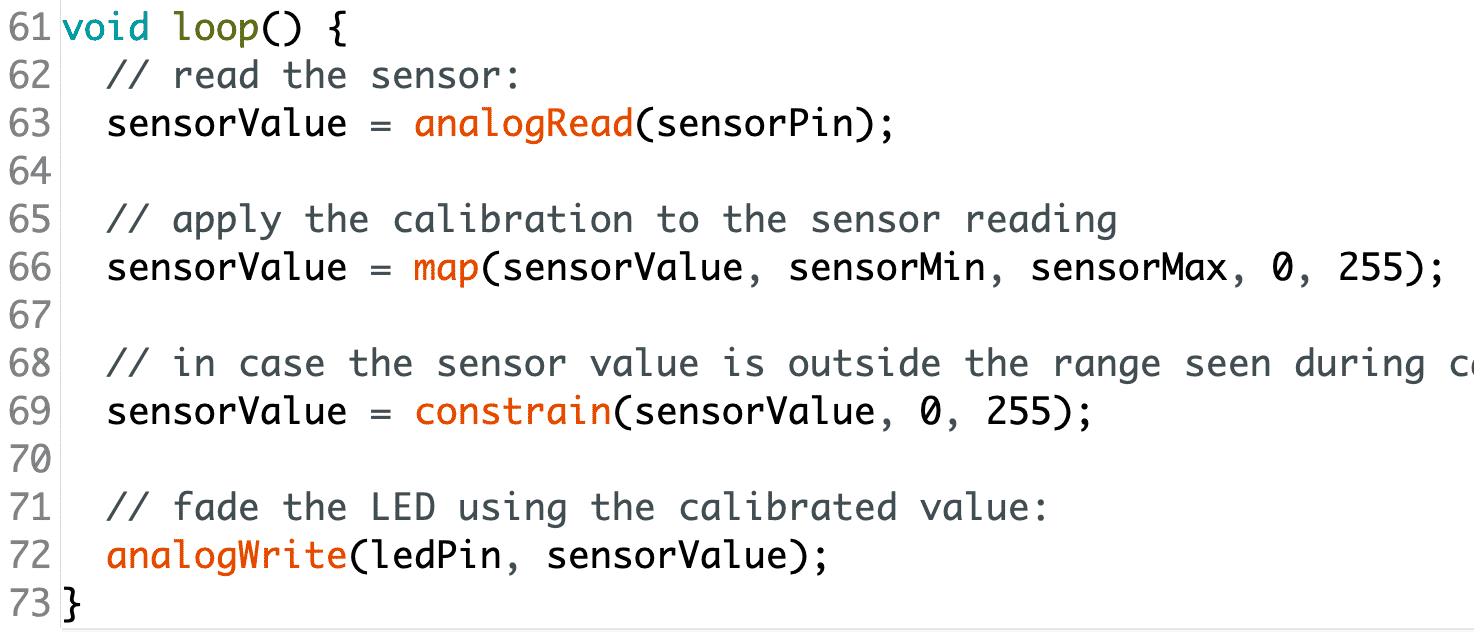
void loop()
int sensorValue = analogRead(sensorPin); // Read sensor value
int displayValue = map(sensorValue, 0, 1023, 0, 99); // Map to display range
lcd.setCursor(0, 0);
lcd.print("Sensor Value: ");
lcd.print(displayValue);
Here, the sensor reading is mapped to a range of 0 to 99, which is suitable for displaying on a 2-line LCD with a 16-character width.
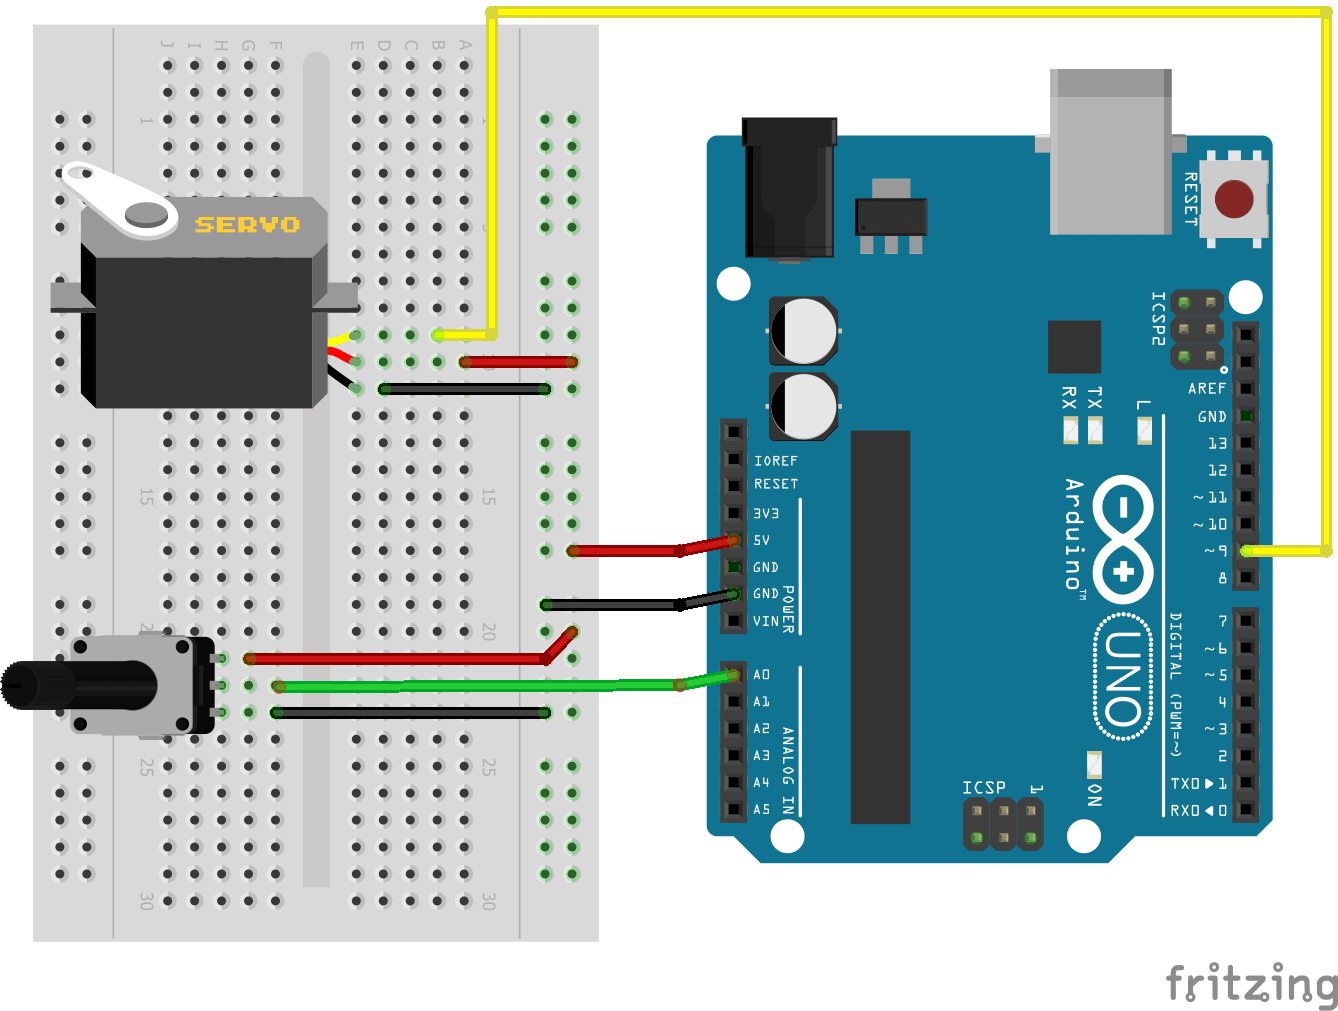
3. Mapping Joystick Input to Servo Angle:
int xPin = A0; // Joystick X-axis connected to analog pin A0
int servoPin = 9; // Servo connected to digital pin 9
Servo myservo;

void setup()
  myservo.attach(servoPin);


void loop()
  int xValue = analogRead(xPin); // Read joystick X-axis value
  int servoAngle = map(xValue, 0, 1023, 0, 180); // Map to servo angle range
  myservo.write(servoAngle); // Control servo angle
In this example, the joystick’s X-axis input is mapped to the range of 0 to 180, which is the valid angle range for a standard servo motor.
Importance and Benefits of the map() Function
The map() function significantly enhances Arduino programming by:
-
Simplifying Code: It eliminates the need for complex calculations to convert values between different ranges, making your code more concise and readable.
-
Improving Accuracy: By ensuring values are within the correct range, the
map()function contributes to more accurate and reliable results in your projects. -
Enhancing Flexibility: It allows you to easily adapt your code to different sensors, actuators, and display devices by simply changing the input and output ranges in the
map()function. -
Reducing Development Time: The
map()function simplifies the process of scaling and transforming values, saving you valuable development time and effort.
FAQs about the map() Function
1. Can the map() function handle values outside the input range?
No, the map() function works only within the specified input range. If you provide a value outside this range, the output will be extrapolated beyond the output range, potentially leading to unexpected results.
2. What happens if the input and output ranges have different sizes?
The map() function will scale the input value proportionally to the size of the output range. For example, if the input range is 0 to 100 and the output range is 0 to 200, a value of 50 in the input range will be mapped to 100 in the output range.
3. Can the map() function handle negative values?
Yes, the map() function can handle negative values. The input and output ranges can include negative values, and the function will map the input value accordingly.
4. Is the map() function limited to integer values?
No, the map() function can handle both integer and floating-point values. However, the return value of the map() function is always a long integer.
5. Are there any alternatives to the map() function?
While the map() function is a convenient and efficient solution, you can achieve similar results using mathematical calculations. However, the map() function offers a more concise and readable approach.
Tips for Using the map() Function Effectively
-
Understand the Ranges: Before using the
map()function, ensure you understand the input and output ranges for your specific application. -
Avoid Extrapolation: Do not provide input values outside the defined range to avoid unexpected results.
-
Consider Data Type: Use appropriate data types for the input and output values, especially when working with floating-point numbers.
-
Test Thoroughly: Always test your code with different input values to ensure the
map()function is working as expected.
Conclusion
The map() function is an essential tool in the Arduino programmer’s arsenal. It simplifies the process of scaling and transforming values, making your projects more efficient, accurate, and adaptable. By understanding the functionality and applications of this function, you can leverage its power to create more sophisticated and robust Arduino projects. The map() function empowers you to control sensors, actuators, and display devices with greater precision, ultimately enhancing the functionality and user experience of your creations.


Closure
Thus, we hope this article has provided valuable insights into The Map Function in Arduino: A Comprehensive Guide. We hope you find this article informative and beneficial. See you in our next article!